A Raspberry PI can be used as a cheap option to getting Amigas online. All you need is a Raspberry PI, a cheap serial port adapter for the PI and a TCP/IP stack for the amiga. I used a Raspberry PI 2 and MiamiDx in this guide. My PI is running Debian Jesse (latest version).
Hardware
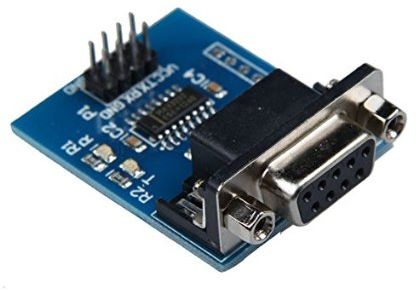
I used a cheap RS/232 Serial to TTL convertor connected to the Raspberry PI GPIO pins. The model I used is a Tenflyer MAX3232 RS232 Serial Port to TTL Converter. It only cost £1.88 but shipping took ages as it came from China. Here is the model on Amazon
Connecting the MAX232 to the PI
- The kit comes with 4 cables. Connect these to the 4 pins on the board.
- Connect VCC to pin 4 (5V) on the PI.
- Connect TX to pin 8 (GPIO14) on the PI.
- Connect RX to pin 10 (GPIO15) on the PI.
- Connect GND to pin 6 (GND) on the PI.
Note that there is no RTS or CTS pins so we need to use software handshaking (which is not ideal!).
Testing the connection
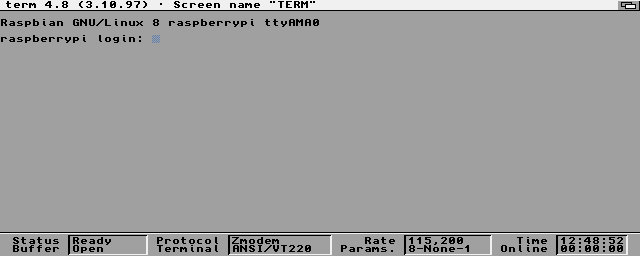
Connect the PI to the serial port of the Amiga. Open a terminal program on the Amiga (I used Term). Set the serial port parameters to 115200, 8N1, software handshaking (‘None’ in Term). You should see a serial console.
Configuring the PI
1. Disable shell and kernel messages on the serial port.
1 | sudo raspi-config |
Select 9 – Advanced Options
Select A8 – Serial – Enable/Disable shell and kernel messages on the serial connection”
Select No
2. Add enable_uart to boot/config.txt.
1 | sudo nano /boot/config.txt |
Make sure this line is present, else ttyAMA0 will not be available
1 | enable_uart=1 |
3. Install the PPP daemon
1 | sudo apt-get install ppp |
4. Enable ipv4 forwarding
1 | sudo nano /etc/sysctl.conf |
Uncomment this line:
1 | net.ipv4.ip_forward=1 |
5. Start the PPP daemon on boot
1 | sudo crontab -e |
At the bottom add this:
1 | @reboot /usr/sbin/pppd /dev/ttyAMA0 115200 noauth local passive xonxoff persist ms-dns 192.168.1.1 192.168.2.130:192.168.1.131 |
Note: This assumes your dns server is at 192.168.1.1.
6. Add a port forward
1 2 | sudo iptables --table nat --append POSTROUTING --jump MASQUERADEsudo apt-get install iptables-persistent |
Answer Yes to the ‘Save current IPv4 rules?’ question.
7. Reboot the PI
Configuring Miami
MiamiInit does not seem to detect the correct settings for me (wrong baud rate / handshaking?).
Settings are pretty simple:
- Hardware: Create a Serial interface. Speed = 115200. Flow control = Xon/Xoff. Modem Settings = Null Modem
- Dialer. Create an empty definition
- Interfaces. Create a new PPP dial-out interface. Change IP type & Gateway to dynamic. Under PPP enable “Get DNS from IPCP”. Under TCP/IP Settings set “Get dynamic DNS servers” to “add”
Note: The Miami builtin serial device driver does not work. Use serial.device (or a replacement).
Click Online and Miami should quickly connect. I have included an example Miami config file here (this uses 8n1.device, you may need to change this).
Serial port tweaks
I recommend using a replacement serial.device.
- 8n1.device: Confirmed working
- BaudBandit.device: Does not seem to work
You may need to reduce the speed to 57600 on slower machines.
Advanced
If you have an add-on serial port like a HyperCOM you can increase the baud rate. This requires increasing the UART clock on the PI. Edit boot.txt and change the uart line:
1 | init_uart_clock=4000000 |
Now you can use 230400 in the ppd parameters:
1 | sudo pppd /dev/ttyAMA0 230400 noauth local 192.168.1.1 xonxoff persist 192.168.2.130:192.168.1.131 |
Screenshots
Internal serial @ 115200 vs HyperCOM @ 230400
Notes/Todo
- My HyperCOM zorro card has internal 8 pin connectors. It would be nice to use an adapter that does not use the external serial port. Possibly something like this
- Enabling RTS/CTS hardware handshaking would be nice as it should reduce the CPU usage and increase reliability. Not sure if it is possible with the Tenflyer MAX3232 I have.
- I own a Raspberry PI3, but I have not tested it yet. I read on the RPI boards that there may be problems with the PI3, this was posted as a workaround.
- FTP needs passive mode to work. I suspect iptables needs tweaking.
i just want to thank you for this post. its the first working manual i’ve found via google!
p.s. if you use a usb to rs232 adapter the crontab line must be
@reboot /usr/sbin/pppd /dev/ttyUSB0 38400 noauth local passive xonxoff persist ms-dns 8.8.8.8 10.0.0.1:10.0.0.2
whereas the amiga 500 is captable to use 38400 at maximum if you reduce its screen color depth to 4 colors only. with 8/16 colors you can only user 19200 baud.
Hello,
in most tutorials people use different ip range for ppp and intranet.
Then change iptables to use nat and masquerading?
Don’t understand this in detail.
Why do so?
I set up ppp on Mac OS X with all ips in the same network and use proxyarp option and activate forwarding in the kernel. It works fine.
Same on raspberry did not work! ppp0 is established but no Ping possible to home network. Only traffic between the two ppp points.
Hi there,
thanks for this article! However I’m also having issues here. I’m using a usb adapter like gerhard, with MiamiDX for the tcp stack, and like Thorsten I’m stuck after establishing the ppp connection. I don’t know how to debug the issue either.
Hi
First of all: Thank you for this great project. I would like to write a german Tutorial of your Projekt and publish it on my page. Can you give me the permission to copy / translate it, and post it on my page? (Of course with your name and link). That would be really great.
Thanks you and best regards
Mingo